


StoreCanvas Lite
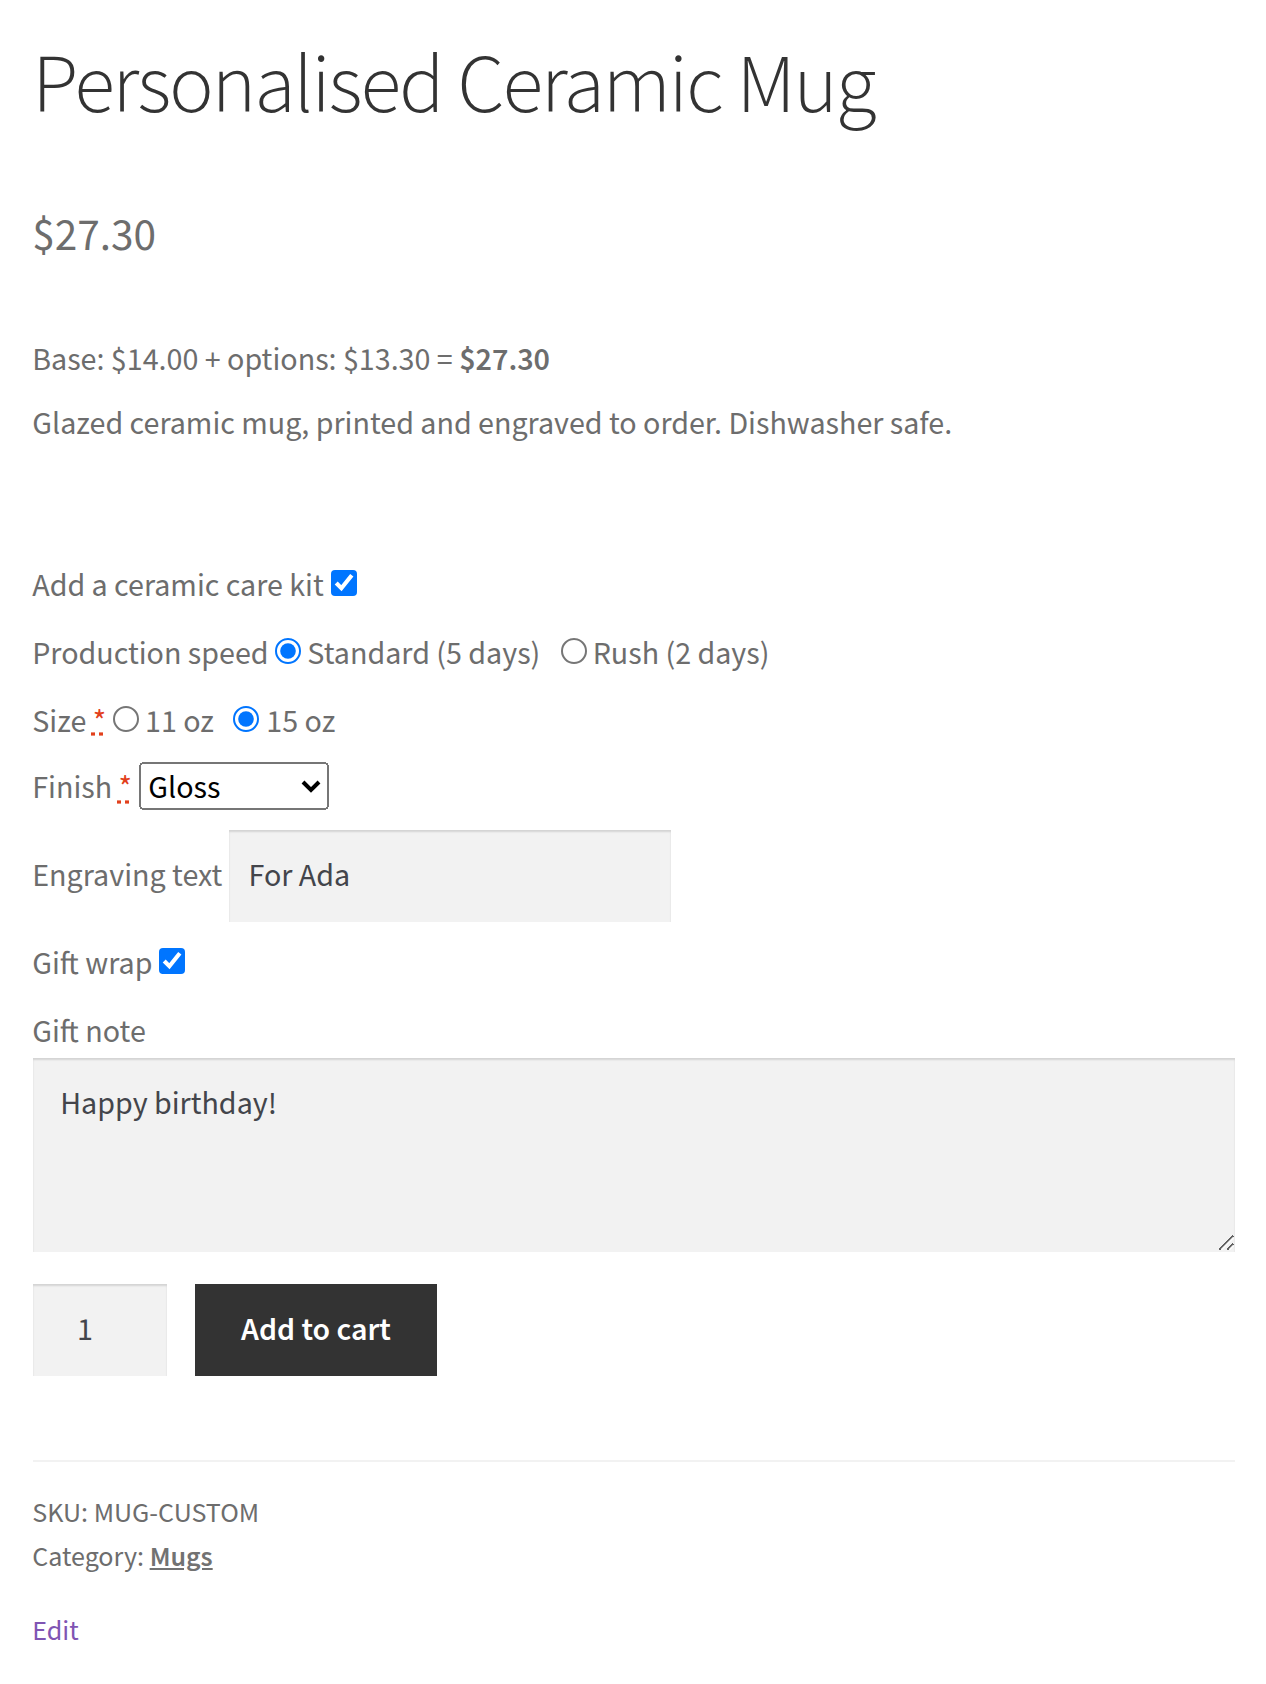
What the customer sees: radio, dropdown, text, checkbox and a gift note that appeared when Gift wrap was ticked, with the live price "Base + options = total". The last two fields come from an option group.
StoreCanvas Lite adds extra choices to your WooCommerce products: sizes, finishes, colours, engraving text, gift wrap, gift notes, rush production, file names and more. Each choice can change the price, and the price on the product page updates as the customer picks. Free forever, with no license key, no account and no phone-home.
What your customer sees. Under the product’s price, your option fields appear above the Add to cart button. As they choose, a line such as “Base: $14.00 + options: $13.30 = $27.30” updates live. Fields you mark as required must be filled before the item can be added to the cart. Their choices then follow the order everywhere: cart, checkout, order emails and the order screen in your admin.
Let customers design it. Turn on the customer design canvas for a product and your customer can put their own text and photos on the product image before buying: pick a font and colour, move, resize and rotate each layer, bring it forward or send it back, all inside the print area you drew. The preview and the original photos come with the order, ready to print. No account, no credits, no outside service: everything stays on your store.
What you set up. On any product, open the StoreCanvas Lite tab in the Product data box and click Add field. Give the field a label, pick a type, choose how it is priced and (for dropdowns, radios and image choices) type the choices. That is all a basic option needs. Everything else (stock per choice, fields that only appear after another choice, fields reused across many products) is optional and explained step by step below.
Features
- 15 field types: dropdown, radio buttons, checkbox, multi-select, short text, long text, email, phone, phone (tel), number, date, colour picker, image choice, file upload and section heading.
- 5 ways to price a field: a flat fee, a percent of the product price, an amount times a number the customer enters, an amount per character typed (engraving), or a different price for each choice (lookup table). Negative amounts work as discounts; the price never drops below zero.
- Live price on the product page that matches what the cart charges, on classic and block themes.
- Quantity discounts: “buy 10 or more, 10% off each” or “25 or more, $3 off each”, up to 10 tiers per product. A “Buy more, pay less” table shows on the product page, and the quantity counts every item of that product in the cart, in any option or size.
- Conditional fields with AND/OR rules: show a field only when other fields match, for example “Gift note” when “Gift wrap” is ticked, or “Rush date” when Size is Large AND Quantity is more than 10. Rules can test is, is not, contains, more or less than, empty and “is one of”. Hidden fields are never charged or required.
- File uploads with limits: customers attach a file (a logo, a photo, a print-ready PDF) to the order. You choose the allowed types (JPG, PNG, GIF, WebP, PDF) and a size limit per field. Every file is checked on the server, stored in a protected folder and offered to you as a download link on the order.
- Stock per choice: give any choice its own stock count. Sold-out choices are disabled on the product page, stock goes down when an order is placed and comes back when an order is cancelled, fails, or a refund restocks it.
- Option groups: build a set of fields once (for example “Gift options”) and apply it to whole product categories or a list of products.
- Per role and per variation: show a field only to certain user roles (for example wholesale) or only for certain variations of a variable product.
- Validation: required fields, minimum and maximum characters, number ranges and steps, and email, colour and date formats are checked before add to cart.
- Orders: each choice and its price appear as line-item details in the cart, checkout, emails and admin order screen.
- Compatible with WooCommerce HPOS (custom order tables), the block cart and block checkout.
- Customer design canvas (free): one print area on the product’s main image. Customers add text (5 built-in fonts, any colour, bold) and upload PNG or JPEG images, then move, resize, rotate, layer and delete them with a mouse, a finger or the keyboard. Optional: require a design, turn photo uploads off, limit the number of layers and charge a flat design fee (added through the same server-side pricing as the options). The design preview shows in the cart, checkout, order emails and My Account; the admin order screen has download links for the preview and every original photo.
- Help & demo page with a one-click demo product and a support ticket form.
Setup guide
Step 1: Install and activate. In WordPress go to Plugins Add New, search for “StoreCanvas Lite”, click Install and then Activate. WooCommerce must be active. A Help & demo link appears under the plugin’s name on the Plugins screen, and the same page lives at Products StoreCanvas Lite help.
Step 2 (optional): Look at the demo. On Products StoreCanvas Lite help, click Create demo data. It creates one hidden product (not shown in your shop or search) that uses every pricing type, a conditional field and stock per choice, plus one option group. Open it from the links on that page to see the product page, the live price and the cart. Click Remove demo data when you are done; uninstalling the plugin removes it too.
Step 3: Add your first field. Edit a product. In the Product data box, open the StoreCanvas Lite tab and click Add field. A new row appears. Fill in:
- Label: what the customer reads, for example “Size”.
- Type: for example Dropdown or Radio.
- Required: tick it if the customer must choose before adding to cart.
- Price: the pricing method and amount (see Step 4).
- Choices: for Dropdown, Radio, Multi-select and Image choice, type the choices separated by commas (a Checkbox is a single tick box and needs no choices), for example
Small, Medium, Large.
Click Update to save the product. View the product: the field is there, under the price.
Step 4: Price it. Pick one of these in the Price dropdown for each field:
- Flat fee: adds the amount once when the field is used. Example: Gift wrap, Flat fee, 1.50.
- Percent of product: adds that percent of the product (or chosen variation) price. Example: Premium finish, 10.
- Per quantity: the customer types a number, and the amount is multiplied by it. Example: Extra name tags, Per quantity, 2.00 (5 tags = $10).
- Per character (text): for text fields; each character typed costs the amount. Example: Engraving text, 0.20 (“For Ada” = 7 characters = $1.40).
- Per choice (lookup table): each choice has its own price. Write the price after the choice with an equals sign:
11 oz, 15 oz=3, orMatte, Gloss=2.5, Metallic=4. A choice with no=costs nothing extra. Use a minus sign for a discount:Student=-5.
Step 5 (optional): Stock per choice. Add @ and a number after a choice to give it a stock count: Steel@40, Black=2@12, Rose gold=5@0. Here Black costs $2 extra with 12 left, and Rose gold shows as sold out. Leave the @ off and the choice is unlimited. Stock is reduced when the order is placed and returned if the order is cancelled or fails, or if you tick “Restock refunded items” on a refund. If you edit the stock while orders come in, StoreCanvas Lite applies your change to the current count instead of overwriting sales.
Step 6 (optional): Show a field only when needed. On the field that should appear later, click Add condition, pick the other field, a test and a value. Add more rules and choose all (every rule must match, AND) or any (one rule is enough, OR):
- Show “Engraving text” when the checkbox “Add engraving” is ticked:
Add engravingis1(a ticked checkbox counts as 1). - Show “Gloss care tips” only when Finish is Gloss:
FinishisGloss. - Show “Rush date” when Size is Large and more than 10 are ordered: all of
SizeisLarge,Quantityis more than10. - Show “Upload your logo” for either print option: any of
PrintisFront logo,PrintisBack logo(or one rule:Printis one ofFront logo, Back logo).
Products set up with the older “Show if field / equals” boxes keep working; the builder shows that rule as a condition.
File uploads. A File upload field shows tick boxes for the allowed file types (JPG, PNG and PDF by default; GIF and WebP too) and a Max size (MB) box (5 MB when empty, and never more than your server allows). Customers see the allowed types and size under the button and are told straight away when a file does not fit. The server checks every file again, including that its content really is the type its name says.
A hidden field is never required and never charged. Fields can also be limited to user roles (Roles box, for example wholesale_customer) or to variations (Variation IDs box, the IDs shown in the Variations tab).
Step 7 (optional): Reuse fields with an option group. Go to Products Option groups Add option group. Give it a title, paste the fields into Fields JSON (the easiest way is to build them on one product first; a group uses the same JSON), and choose where it applies: type product IDs in Product IDs and/or tick categories under Product categories. Every product in those categories now gets the group’s fields under its own. On a product’s StoreCanvas Lite tab, group fields are listed separately with a link to their group; edit them in the group, not on the product. A product field with the same ID as a group field replaces it on that product. The ticked list under “Global option groups” adds a group to one product even when it is not assigned.
Step 8 (optional): Let customers design the product. On the product’s StoreCanvas Lite tab, scroll to Customer design canvas and tick Let customers design this product. The product needs a main (featured) image: that is the mockup the customer designs on. Drag the blue box on the image (or type Left, Top, Width and Height in %) to mark where printing is possible; designs are clipped to this area. Then choose:
- A design is required to add to cart: the Add to cart button asks for a design first.
- Allow image uploads: customers may add their own PNG or JPEG photos (up to 5 MB each by default).
- Max layers: how many texts and images one design may have.
- Design fee: a flat amount added to the line when a design is added (0 for free).
Click Update. On the product page the canvas appears above Add to cart. When the order comes in, open it in WooCommerce Orders: the line item shows the design preview and links to download the preview PNG and each photo the customer uploaded, plus the text, font and colour used.
Step 9 (optional): Quantity discounts. On the product’s StoreCanvas Lite tab, find Quantity discounts. In each row, type the quantity the discount starts at (2 or more), the discount, and whether it is a percentage or an amount off each item. Example: 10, 10, % off each; then 25, 15, % off each. Empty rows are skipped. The discount comes off the whole item price, options included, and the cart shows it on the line. The product page lists the tiers in a “Buy more, pay less” table and the live price shows the saving for the quantity chosen.
Step 10: Test an order. Add the product to the cart with some choices. The cart and checkout show each choice and the total. After checkout, the order screen in WooCommerce Orders lists every choice under the line item.
Good to know
- Prices you see on the product page are recalculated on the server for the cart and checkout, so a customer cannot change a price in the browser.
- If you change a product’s price later, carts that already contain it are repriced from the new price.
- Field changes apply to new add-to-carts. Orders already placed keep the choices and prices they were sold with.
- Files customers attach with a file upload field are checked (allowed type, real content, size) and kept in the same protected folder as design files. Shop staff download them from the order screen.
- Design files are kept in a protected folder (
wp-content/uploads/sclt-designs/) that cannot be browsed or opened directly; they are shown through short-lived signed links. Photos from designs that were never ordered are deleted automatically after 7 days.
A paid StoreCanvas plugin is sold separately at https://tillpress.com/storecanvas/ for shops that need more than one print area: several product views and print areas, a clipart library, design templates, print-ready PNG/SVG/PDF files, a production desk, Printful/Printify and Fancy Product Designer import. It is a different plugin. StoreCanvas Lite, including its design canvas, is complete on its own and is never locked or time-limited.
External services
StoreCanvas Lite has no license check, no telemetry, no account, and makes no outbound requests during normal use. The one exception is a support ticket you choose to send.
The customer design canvas uses no outside service: its fonts are bundled with the plugin, customer photos are uploaded only to your own site, and nothing is sent to Tillpress or anyone else.
Support tickets (only when you send one): the Help & demo page has a support form. When an administrator fills it in, ticks the consent box, and presses Send ticket, the plugin sends the name, reply-to email, topic, subject, message, this site’s address, and (if ticked) a system report of WordPress/WooCommerce/PHP versions, theme, and active plugin names to the Tillpress support desk at https://tillpress.com/wp-json/tp/v1/support. Nothing is sent automatically, in the background, or on a schedule, and no passwords, keys, or customer/order data are included. Service provider: Tillpress (Alex Software Holdings LLC). Privacy policy: https://tillpress.com/privacy/ — Terms: https://tillpress.com/terms/ . “Email instead” opens the same ticket in your own email app and sends nothing from the site.
Privacy
Design canvas. When a customer uses the design canvas, these files are stored on your own server, in wp-content/uploads/sclt-designs/ (never in the Media Library and never sent anywhere else): the design preview image, every PNG/JPEG photo the customer uploads for the design, and, on the cart line and order item, the design itself (texts, font, colour and positions). Guests can use the canvas without an account.
- The folder is protected: file names are long random strings, the folder blocks …