
Contact Form Email
Adding fields to the contact form
Contact Form to Email features:
► Email delivery & notifications
► Direct email reply with free AI assistant (no API key required)
► Saves messages into database
► Export to Excel / CSV
► Printable list of messages
► Visual drag and drop form builder
► Anti-spam captcha
► Field validation
► Printable reports
► One-click contact form
► Classic and AJAX submission available
► Automatic email reports
► Supports GDPR-compliant forms
► ... and more features (see below)
Contact Form to Email is a powerful and easy-to-use WordPress plugin to create contact forms, send their data to email addresses, and reply directly from the admin dashboard with AI assistance.
Contact Form to Email also saves the contact form data into a database, provides printable reports, and includes the option to export selected data to CSV/Excel files.
Contact Form to Email Main Features:
- Direct Email Reply with AI Assistant: Reply to bookings and contact messages directly from the WordPress admin messages list. Includes a built-in, free AI assistant to automatically draft polite, context-aware responses in seconds—with no API key or external account required.
- Email delivery / notifications: The contact form data is sent by email to one or more email addresses. It also supports configuring auto-replies to the user who filled out the contact form.
- Form data saved into the database: Avoid losing submissions and keep a complete record of received contact form messages.
- Printable list of messages: View the list of messages received from the contact form within a selected date range and print it.
- Export data to CSV/Excel: Export contact form data to a standard format that can be used by other applications. Export email addresses and other contact form data using date and text search filters.
- Automatic reports: Generate automatic reports of contact form usage and submitted data, including daily submission reports, cumulative hourly reports, and printable reports for specific fields to help you understand your data.
- Automatic email reports: Send automatic reports to specified email addresses on a regular schedule.
- Form validation: Set validation rules for each contact form field to keep your data clean.
- Anti-spam protection: Built-in captcha anti-spam protection. No need to rely on external services for contact form anti-spam protection.
- Drag and drop contact form builder: An intuitive contact form builder for customizing form fields and validation rules.
- Customizable email messages: Specify the text of the contact form email notifications. Supports both plain text and HTML-formatted emails.
- Multi-language support: The contact form builder allows you to enter field labels and validations in any language, with full support for special characters.
- Classic and AJAX submission: After clicking the submit button, the user can be redirected to a “Thank You” page, or a “Thank You” message can be displayed on the same form page without refreshing it. This can be configured in the settings.
- Enable/Disable notifications: Both email notifications to administrators and email confirmations to users can be optionally enabled or disabled from the settings area.
Contact Form to Email – More Features
There are also commercial versions of Contact Form to Email with additional features available at https://form2email.dwbooster.com/download
The commercial version can be converted into a payment form or booking form with integration for multiple payment gateways: PayPal Standard, PayPal Pro, Stripe, Authorize.net, Skrill, Mollie / iDEAL, TargetPay / iDEAL, SagePay, RedSys TPV, and Sage Payments. Payments are SCA-ready (Strong Customer Authentication) and compatible with the EU Payment Services Directive (PSD2).
The commercial version also features an ultra-powerful visual form builder, file upload fields, conditional logic, multi-page forms, WooCommerce integration, Mailchimp integration, Clickatell and Twilio SMS integration, iCal attachments, signature fields for signing with a mouse or directly on touchscreens, and more.
Contact Form to Email Messages List
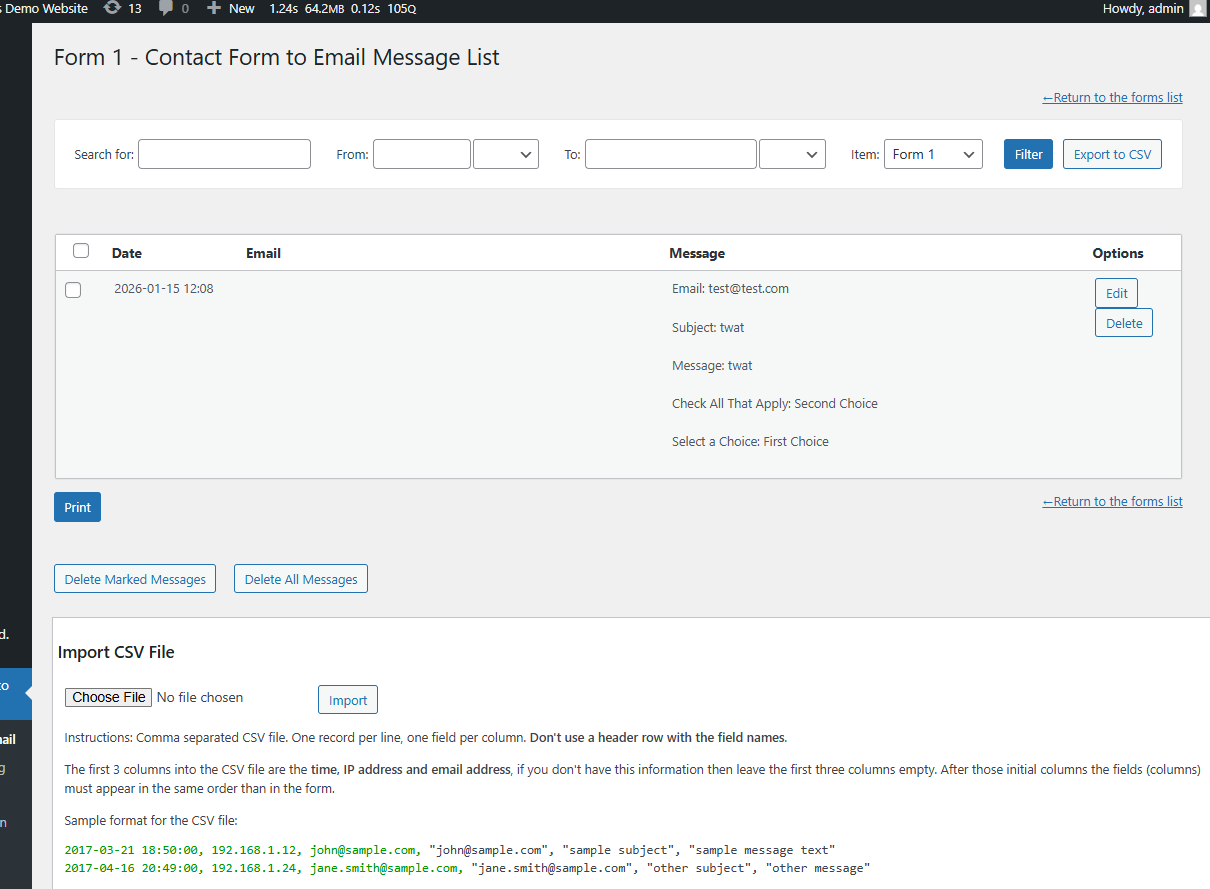
The messages list helps you review past contact form submissions, reply directly to users, and print or export records. It includes a search/filter form with the following options:
- Search for: Search for specific text within the contact form messages.
- From … To: Date range to include in the list and reports.
- Item: If you have more than one contact form, select whether to view results from a specific contact form or from all forms.
- Filter: Displays the list according to the selected filters and options.
- Export to CSV: Exports the CSV data according to the selected filters and options.
Each message in the list includes quick action buttons:
- Reply (with AI Assistant): Opens a reply modal pre-filled with the user’s email address and original submission. You can type brief instructions (e.g., “Confirm the booking for Tuesday at 10 AM”) and click Generate with AI to draft a complete reply using a free, keyless AI service. Sent replies are automatically appended to the message record for easy tracking.
- Edit: Modify the stored submission data.
- Delete: Remove individual or marked submissions.
The exported CSV file contains a header row with the field names, followed by one contact form submission per row, with one form field in each column. This allows you to easily import the data into other applications or select only the columns/fields you need (for example, selecting only email addresses). A CSV file can be opened and managed directly in Excel.
The list of contact form messages is shown below the search area. A Print button below the list formats the messages into a printer-friendly view.
The Contact Form Reports
The reports section lets you analyze the usage of your contact forms and the data entered into them. The first section contains a filter bar similar to the one on the messages list page. Below the filters, three graphical reports are available:
-
Submissions per day: Displays a line graph showing how many contact form submissions were received each day within the selected date range. This report can be used to evaluate contact form peaks and measure the impact of marketing campaigns.
-
Submissions per hour: Displays a line graph showing how many contact form messages were received during each hour of the day across all messages in the selected date range. This report helps identify peak hours so you can focus support resources accordingly.
-
Report of values for a selected field: Select any contact form field or metadata field (such as date, IP address, or hour) to see how many times each value has been entered or selected. This is very useful if your form is used as a poll to gather feedback, making it easy to generate reports on selectable fields and better understand your customers’ profiles and needs.
A Print button at the bottom of the page lets you print the value report for the selected contact form field in a printer-friendly format.
Automatic Email Reports
The Contact Form to Email plugin supports two types of automatic (periodic) email reports:
-
Global Email Reports: Configured below the list of forms. This option sends a report containing new submissions across all forms every specified number of days.
-
Form Email Reports: Configured on the settings page of each individual form. This option sends a report containing new submissions for that specific form every specified number of days.
Reports are attached as a CSV/Excel file to the emails. In both cases, you can specify the destination email addresses, email subject, email text, and report interval. More information is available in the “Other Notes” section.
Language Support
The Contact Form to Email plugin is compatible with all character sets. The troubleshoot area contains options to change the encoding of the plugin database tables if needed. Multiple translations are already included in the plugin.
Form Builder & AI-Assisted Replies
The plugin includes a visual drag-and-drop form builder to add, modify, and delete text fields, textareas, and email fields with their respective validations, plus an AI-assisted email reply system directly inside the bookings/messages list.
Replying to contact form messages with AI: Go to the “Messages” section and click the “Reply” button next to any submission. A modal window will open with the recipient’s email address and original message pre-loaded. You can optionally enter brief instructions in the AI Assistant Instructions box and click Generate with AI to automatically compose a response without needing an API key, then click Send Reply.
Opening the contact form messages in Excel: Go to either the “Reports” or “Messages” section and click the button labeled “Export to CSV”. CSV files can be opened in Excel—just double-click the downloaded CSV file, and it will display the selected contact form submissions, one per line.
Deleting a contact form message: Go to the “Messages” section and use the “Delete” button for the contact form message you want to delete. Each row in that list represents a contact form submission.
Getting the contact form email from the user: The “From” address used is a fixed email address specified in the contact form settings, which helps prevent emails from being classified as spam. However, when you click “Reply” in your email client, the user’s email address will appear automatically as the recipient because the Reply-To header is set for this purpose.
Customizing the captcha image: The captcha image used in the contact form is 100% implemented inside the plugin, so you don’t need to rely on third-party services or servers. In addition to the settings for customizing the captcha design, you can also replace the font files located in the contact-form-to-email/captcha/ folder.
Contact form email format: Notification emails sent from the contact form can be either plain-text or HTML emails. Plain-text emails are preferred in most cases since they are easier to edit and are more likely to pass anti-spam filters.
Contact form Clone button: The Clone button duplicates a complete contact form along with its settings. The contact form messages/emails and statistics are not duplicated.
Custom contact form submit button
There is a settings section in each form that allows you to specify the label of the submit button.
The class="pbSubmit" selector can be used to modify the button styles.
The styles can be applied in any of the CSS files of your theme or added in “Contact Form to Email > Customization area > Add Custom Styles” (at the bottom of the page that contains the list of forms).
For further modifications, the submit button is located at the end of the file cp-public-int.inc.php.
For general CSS style modifications and examples, check this FAQ entry: https://form2email.dwbooster.com/faq#q82
Customizing the automatic email reports
The settings for the email reports (both global and per-form reports) include the following configuration fields:
- Enable Reports?: Option for enabling or disabling the reports.
- Send report every: Indicate how often (in days) the reports will be sent.
- Send after this hour (server time): Approximate time at which the reports will be sent, based on server time. Some site activity is needed to trigger report delivery, or you can set up a cron job for exact delivery timing.
- Send email from: The “From” email address used for the reports. Avoid
@aol.comand@hotmail.com“From” addresses to prevent anti-spam filtering issues. - Send to email(s): The list of email addresses (comma-separated) that will receive the reports.
- Email subject: Subject of the email sent with the Contact Form to Email reports.
- Email format?: Format of the email sent with the reports (HTML or Plain Text). In most cases, plain text is easier to set up and encounters fewer issues with anti-spam services.
- Email Text (CSV file will be attached): Content of the email that will contain the Contact Form to Email reports. The reports will be attached in CSV format.
The contact form database
The messages received via the contact form are stored in the WordPress database table wp_cftemail_messages. You can export that data as automatic email reports or in CSV/Excel format from the messages list area. If needed, you can also query that table directly for further processing of the contact form data.
Importing messages
There is an option to import messages into the Contact Form to Email plugin, located below the messages list and labeled “Import CSV”.
Messages can be imported from a comma-separated CSV file: one record per line, one field per column. Do not use a header row with the field names.
The first 3 columns in the CSV file are the time, IP address, and email address. If you don’t have this information, leave the first three columns empty. After those initial columns, the fields (columns) must appear in the same order as in the form.
Sample format for the CSV file:
2013-04-21 18:50:00, 192.168.1.12, [email protected], "[email protected]", "sample subject", "sample message"
2013-05-16 20:49:00, 192.168.1.24, [email protected], "[email protected]", "other subject", "other message"
“From” address used for the emails
In the “Form Processing / Email Settings” section, the first setting is named Send email “From” and has the following options:
-
From fixed email address indicated below – Recommended option: If you select “From fixed…”, the customer’s email address will appear in the “To” address when you hit “Reply”. This is the recommended setting to avoid mail server restrictions.
-
From the email address indicated by the customer: If you select “From customer email”, the customer’s email will appear visually as the sender when you receive the email, but this is not supported by all hosting providers and can trigger spam filters, so it is not recommended in most cases.
The drag and drop contact form builder
The Form Builder lets you add, edit, and remove fields in the contact form and specify validation rules (required fields, email fields, etc.).
The following field types are currently available in the version published in the WordPress directory:
- Single Line Text: Classic one-line text input.
- Email: Validates that the email address has a valid format.
- Paragraph Text: Classic multi-line (
textarea) text input.
In other versions of the plugin, the following fields are also available: Numeric field with specific validations, Date-picker, Checkboxes, Multiple Choice Radio buttons, Dropdown / Select, Upload file fields, Password, Phone with specific validations, static texts, section breaks, and page breaks for multi-page contact forms.
Other features in the contact form builder:
-
Equal fields validation: Use it, for example, to confirm that the email or text typed in two different fields is identical. Valid for “Single Line Text” and “Email” fields.
-
Dependent fields: Use this feature to show/hide fields (any field type) based on the selection made in other fields (checkboxes, radio buttons, or select/drop-down fields). This feature isn’t fully available in this version since the related selection fields aren’t included.